The information contained in this website is now available in book form: The Art of Home Gardening, Volumes 1 and 2. Find them on Amazon at
The Art of Home Gardening
Plant propagation is the process of increasing the number of plants. The most
common method is by planting seeds. Seeds work very well for the plants that
"come true" from seed, that is, the seedlings are practically identical to the
parents. For other plants, such as trees, shrubs and some perennials, seedlings
are highly variable from their parents. These plants are usually
propagated by asexual means, such as, cuttings, dividing, layering and
grafting. These methods produce plants that are clones, that is, genetically identical
to the original plants. Tissue culture is even more versatile but it requires
specialized equipment.
Seeds
For many plants, especially annuals, seeds are the quickest and easiest way to
propagate plants. Seeds are readily available in seed packets for most annual
flowers and vegetables. An increasing number of gardeners maintain "heirloom"
varieties by gathering seeds from their own plants and planting them the
following year.
Pre-treatment
Seeds of annuals generally do not need any pre-treatment before they will grow,
but seed from many trees and shrubs need special treatment before they will
grow. Some seeds, such as legumes, have hard, shiny seed coats that are very
slow to soak up water. They require scarification to soften the seed coat. The
simplest method is to pour hot, not boiling, water over the seeds and let them
soak overnight. Another method is to rub seeds between two sheets of sandpaper.
Larger seeds can be nicked with a file but care must be taken so the embryo
inside is not damaged.
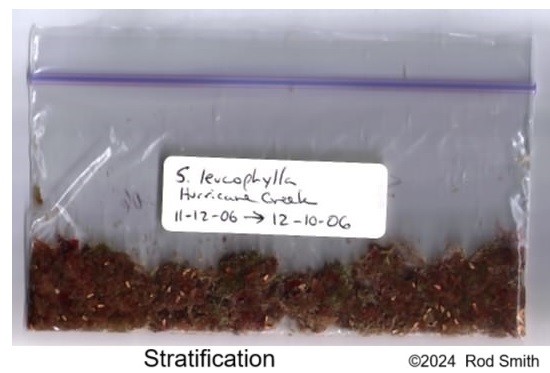
Seed from
most trees, shrubs and perennials native to temperate climates
require stratification to duplicate winter temperatures before they will
grow. Seeds can be planted outside in the fall and go through the winter. More reliably, the seeds
can be mixed with moist peat moss or vermiculite, put in clear plastic bags, and
placed in the refrigerator, not the freezer. Most seeds require eight
weeks of 33 to 41 degrees, some as little as four weeks and some as many
as twelve weeks. When gathering seeds, harvest them as soon as they are
ripe and keep them moist. If seeds become dried out, it is harder to get
them to grow.
Sowing
The seeds of hardy annuals and easy to grow perennials can be planted outdoors
directly into prepared soil once the soil reaches a minimum temperature which
ranges from 40 degrees for peas to 70 degrees for squash. Place seeds at the
recommended depth. Carrot seeds need to be planted near the surface because
they need orange light to germinate. Other seeds need to be planted deep enough
that the seed hull remains in the soil. Lima beans need to be planted with the
concave edge up. If no planting depth
is indicated, plant seeds two to three times as deep as their length.
I place the larger seeds on the surface of the soil and use my finger to push them
down to the proper depth, then close the holes.
Seeds that
require warmer soil and seeds that are hard to grow can get off to a better
start if started indoors about six weeks before being planted outside.
If
only a few plants are needed, it is easier to start them in individual pots.
For best results place two or three seeds in a Jiffy peat pellet such as the ones in
the picture. Another option is to use a peat pot
filled with moist potting soil and an inch of sterile seed starting mix on top. Once
the seedlings are well sprouted, thin to one seedling per pot. Peat pellets or
peat pots can be planted in the garden and the roots will grow right through
the pots so the young plant roots
are not damaged by transplanting out of a plastic pot.
If lots of plants are needed, then plant seeds in a plastic flat with drainage
holes that is filled with moist seed starting mix. Use a yard stick or piece of lath to
indent lines in the soil surface at least an inch apart for small seeds. Spread
the seed in the indented lines and cover with a thin layer of seed starting mix.
Keeping an inch between rows of seeds will help stop damping off disease from
spreading throughout the flat.
Once the seeds are planted, use a spray bottle to thoroughly wet the soil since
a watering can will wash away the dry seed starting mix. Then, cover the soil
with newspaper or clear plastic to hold in moisture until the seeds start to
sprout. Remove the covering as soon as the seeds begin to sprout to prevent disease.
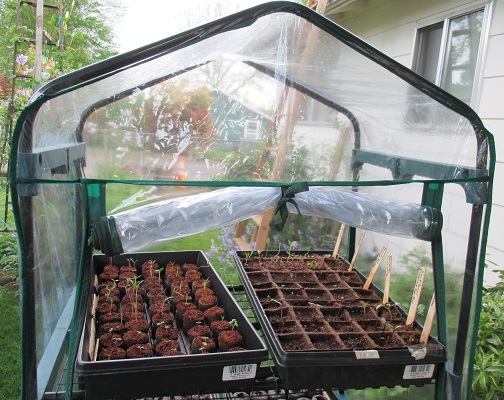
Seeds
will sprout best if kept at room temperature but new seedlings need
bright light and cooler temperatures to make them grow short and sturdy. If the light is too dim, they
will stretch, become spindly, and easily blow over when planted outside. Seedlings should be kept
in a sunny, but not hot, window or placed directly under the brightest fluorescent tubes.
LED Grow Lights are brighter. Even better, I have the mini-greenhouse in the picture that I have on the patio so
the light is brighter and the temperatures are cooler. There is a door that zips shut for nights near freezing.
Transplanting
Seeds started in flats will need to be transplanted to individual pots once the
true leaves start to appear. I recommend transplanting into peat pots although
sometimes I use two inch cell packs or even one inch cell packs for very slow
growing plants such as violas. I cut between the lines of seedlings with a
knife and carefully separate the seedlings holding only the seed leaves. Then I
use a pencil to make a hole in the soil and guide the root into the hole. Then I
close the hole around the roots by pushing the pencil into the soil next to the hole. Modified ice cube tongs can be used to lift the seedling and plug of starting mix out of
the flat and push it into the soil.
Hardening off
Before seedlings can be planted outdoors, they will need a week of hardening
off to help them adjust to harsher growing conditions outside. Ideally, plants
should be moved
to a cold frame and the glass cover lifted a little higher and
a little longer each day unless there are strong winds or frost. An alternative
is to move plants outside to a sheltered location during the day and into a
cool room or garage at night.
Asexual Propagation
The rest of the propagation methods are asexual. Every resulting plant is
genetically identical.
This means that plants with superior flowers, fruit or growth characteristics
can be multiplied. There are several methods so choose the easiest one that works.
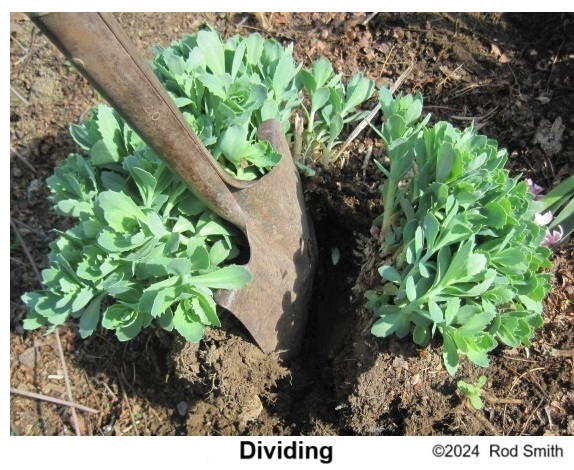
Dividing
Dividing is
simply separating plant parts that already have roots and leaves.
Many perennials which grow in clumps are easy to divide. A simple method is to use
a shovel to cut out a plug of plants and roots, and plant the plug in a different
place. To get more plants, the entire plant can be dug up and individual plants can
be separated and replanted.
Iris are easy to divide simply by cutting each branch off of the main stem and
planting it separately. Agapanthus roots can be watered thoroughly then rolled
back and forth on their side until the clumps separate.
Some shrubs have sprouts coming out of the ground around the shrub. These sprouts
can also be divided from the main shrub. I dug up twenty sprouts from one large lilac.
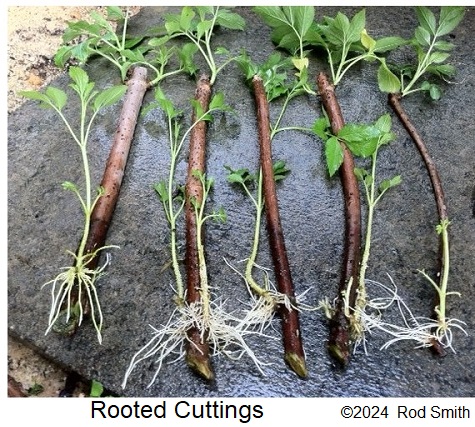
Cuttings
Cuttings
are made from the current season's growth of woody plants. Many
conifers, houseplants, deciduous and broadleaf evergreen plants are started from cuttings.
Cuttings should be collected from strongly growing branches on healthy plants.
Softwood cuttings are the tips of new growth collected in late spring and
summer. Softwood cuttings usually root better but they need more care. Hardwood
cuttings are collected in the fall and winter. Yews will root better if they
are pulled off so a heel of two year old wood adheres to the base of the
cutting. Otherwise, cut the bottom off just below a leaf node. Usually, cuttings are
trimmed so they are three to six inches long.
All leaves are stripped off the lower half of the cutting and the cuttings are dipped
in liquid or powdered rooting hormone. Then cuttings are stuck into a rooting
medium such as sand, perlite or seed starting mix. They will root best if the
rooting medium is heated by heat cables and the air is not heated.
Cuttings need to be kept moist until they have rooted. For large numbers of
plants, automatic mist nozzles can be installed over the cuttings and set to
mist the cuttings every hour during the day, more often in hot weather.
Cuttings can also be misted by hand several times a day. For a few cuttings, a
plastic bag can be put over a pot of rooting medium with sticks to keep the bag
clear of the cuttings. Do not let sun shine on the bag or it
will get to hot. If condensation forms inside the bag, open it a little until the
condensation disappears.
Cuttings should be checked regularly and any cuttings showing signs of disease
should be removed. Softwood cuttings will root in about six weeks. Hardwood
cuttings will take two or three months to root. To check for roots, gently tug
on the cutting.
Some
plants will not put our roots fast enough to be propagated by cuttings so they are
encouraged to put out roots while they are still attached to the mother plant.
Stooling is a method of encouraging roots to grow on woody stems so they can be
divided. Stooling is commonly used to propagate dwarf rootstocks for grafting
fruit trees.
Plants are cut off a few inches tall in the winter so they will grow several sprouts.
In mid-summer, soil is mounded up about a foot high around the sprouts. A plastic pot
with the bottom cut out can be placed over each plant to keep the soil neatly in place.
Roots will grow out of the stems where they are covered by soil. When the plant is
dormant, the soil is removed and the rooted stems are cut off a few inches
above the original ground level. In the spring, new shoots will grow from the
cut off stems and the process repeats.
Layering
Layering is similar to stooling except that a branch is bent down to the ground, held in
place and covered with soil. Roots will form quicker if a short section of bark
is removed just below the part of the branch that is buried.
Cane berries are naturally propagated by layering as the tips of the cane berries
lean over, rest on the ground and put out roots. This is called tip layering.
Air layering is useful for plants that cannot be bent below ground level. It
works very well for house plants such as rubber plants and dracaenas when they get
too tall and have a bare trunk. First, a ring of bark about an inch long is
removed from the trunk. Scrape the wood to make sure the cambium is also
removed. This forces the trunk to develop roots above the cut. Then take a gallon size
Zip Lock bag with the sides cut off. Fold it around the trunk and zip it back together
to form a tube around the trunk. Use twine to tie the bottom edge of the plastic to the
trunk just below where the ring of bark was removed. Then soak sphagnum moss or tree moss in water,
wring it out like a sponge and stuff it into the tube. Finally,
use twine to
tie the top of the tube closed. Normally the moss will stay moist without any
additional watering.
In a couple of months, roots will grow from the stem just above where the bark
was removed. They should be visible inside the plastic. The trunk can be cut
off below the tube and planted into a new pot. Usually, the original plant will
send up new sprouts and they can also be air layered.
Grafting
Some plants
will never put out new roots so they have to be grafted onto a plant
with existing roots. Also, some plants benefit from being grafted onto roots with
better genetics such as dwarfing rootstocks. Grafting is the process of cutting
a twig, called the scion, from one plant and
connecting it onto the roots or top of another plant called the rootstock. The
scion will grow into a new plant as it receives water and nourishment from the
rootstock.
There are many grafting methods and some methods work better for particular
kinds of plants. In all of the different methods of grafting, it is necessary
that the cambium layers of the scion and rootstock are placed next to each
other so the graft will heal together. The cambium layer is the boundary
between the wood and the bark. All growth occurs at the cambium layer.
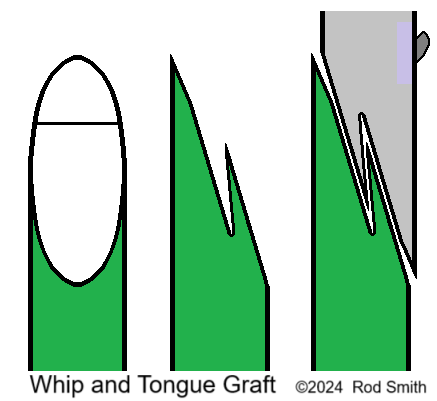
The most common graft is the whip and tongue graft. Both the scion and
the rootstock have to be dormant for this method. An angling cut, about an inch
long, is made in the rootstock. Then a second cut is made beginning about a
quarter of the way down from the tip. The second cut should almost parallel the
first cut so the wood does not split.
This produces a thin wedge of wood called
the tongue. A matching cut is made at the base of the scion. Care should be made
when cutting the scion so the scion ends up right side up. The scion is then
pushed onto the rootstock so the two cuts interlock. Ideally, the rootstock and
scion are about the same diameter so the two cambiums match all of the way around.
If not, then cock the scion to one side a little so the cambiums cross each other
at several points. Finally, wrap the graft with grafting tape or a rubber strip,
partially
overlapping the wraps, to hold the graft tightly together and seal in
moisture. Also, the top of the scion needs to be sealed with a cap of grafting tape
or a drop of latex based tree paint. The graft should heal together about the time
new growth begins. If the graft grows rapidly, it may be necessary to cut the
grafting tape or rubber strip so it does not choke the new growth.
A side graft
is a simpler graft which is usually used on conifers.
An oval shaped cut is made in the side of stem through the bark and slightly
into the wood. A matching cut is made in both the scion and rootstock. The cuts
are held tightly together with grafting tape or rubber strips. Once the graft
has healed, the rootstock is cut off just above the graft.
The side graft is also used on plants that are really slow to heal, such as pines,
so the scion needs to stay attached to its roots until it is healed. In approach
grafting, rootstocks growing in pots are placed next to the scion wood plant
and they are side grafted together. They can stay like this as long as it takes for
the graft to heal. Then the scion is cut off below the graft and the rootstock
cut off above the graft.
Budding
Budding is
a form of grafting where only a single bud is used for the scion.
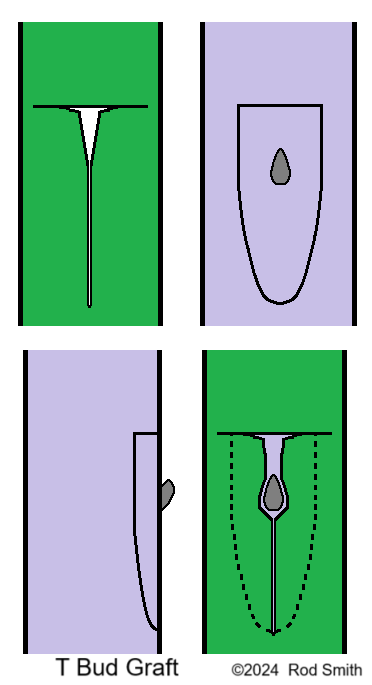
The most common budding method is T-budding, which has the highest
success rate. For this method, the scion has to be dormant and the rootstock
has to be actively growing so the bark will
easily peel from the wood. T-budding is usually done in mid-summer when the buds
on the base of the scion
wood twigs are mature and the tips of the rootstocks are still growing. As the
scion wood is being collected, the leaves should be cut off leaving a short
piece of leaf stem as a handle. T-budding can also be done in the spring if
scion wood is collected in late winter and refrigerated until the rootstock is
actively growing.
First,
a horizontal cut is made in the rootstock about a third of the way
around the twig. Then a vertical cut is made downward from the first cut about
an inch long. This forms the T. The flaps of bark are peeled loose on either
side of the T. Next, on the scion wood, starting about a half inch below a bud,
a thin slice of wood is cut to a point a half inch above the bud. Then a
horizontal cut is made to create a square top on the bud so it is shaped like a
shield. Some grafters like to peel the bud and bark off of the thin slice of
wood while others leave the slice of wood attached.
The bud
shield is then slipped into the T under the flaps of bark until the
square top of the bud shield fits the top of the T. Then it is wrapped with
rubber strips or grafting tape so the shield is covered except for the bud. If
the piece of leaf stem drops off after a week or two, it signals that the bud
is healing properly.
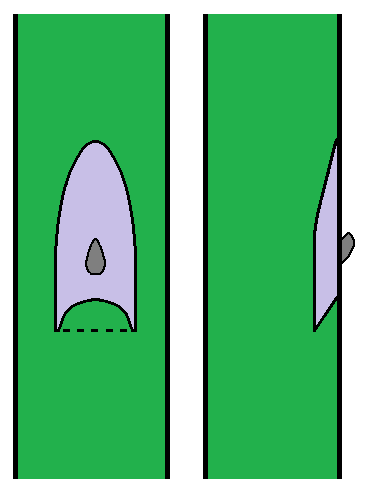
Chip budding
can be done when both scion wood and rootstock are dormant.
A cut is made in the scion wood starting a half inch above a bud and cutting to
a half inch below the bud. A second cut is made starting below the bud and
meeting the first cut. This produces a wedge of wood with the sharp edge at the
bottom. A matching cut is made in the rootstock and the bud is tied in place
with grafting tape or rubber strips.
When budding in the field, buds should always be placed on the north side of
the rootstock. This protects the bud from hot sun and helps the new growth
straighten up quicker. In addition, shields are available to tie over the bud
to protect it from the sun and guide the new growth straight up.
Once the bud has healed, the rootstock can be cut off above the bud to force it
to grow. If the bud is being
added to an existing tree, then make a half-moon
shaped cut through the bark to the wood just above the bud in late winter to
encourage the bud to grow. This cut traps the sap rising through the bark at the
bud so it is more likely to grow.
Grafting Supplies
Special grafting and budding knives, grafting tape and rubber strips are
sometimes available through nurseries and garden centers. They can also be
ordered from A. M. Leonard & Sons, Piqua, Ohio. 1-800-543-8955
www.amleo.com
WARNING!! If you click on a link and a blank screen opens, then connects to a strange website, especially if you see a robot, CLOSE THE NEW WINDOW IMMEDIATELY!! The links will work correctly after the first time.
 most trees, shrubs and perennials native to temperate climates
require stratification to duplicate winter temperatures before they will
grow. Seeds can be planted outside in the fall and go through the winter. More reliably, the seeds
can be mixed with moist peat moss or vermiculite, put in clear plastic bags, and
placed in the refrigerator, not the freezer. Most seeds require eight
weeks of 33 to 41 degrees, some as little as four weeks and some as many
as twelve weeks. When gathering seeds, harvest them as soon as they are
ripe and keep them moist. If seeds become dried out, it is harder to get
them to grow.
most trees, shrubs and perennials native to temperate climates
require stratification to duplicate winter temperatures before they will
grow. Seeds can be planted outside in the fall and go through the winter. More reliably, the seeds
can be mixed with moist peat moss or vermiculite, put in clear plastic bags, and
placed in the refrigerator, not the freezer. Most seeds require eight
weeks of 33 to 41 degrees, some as little as four weeks and some as many
as twelve weeks. When gathering seeds, harvest them as soon as they are
ripe and keep them moist. If seeds become dried out, it is harder to get
them to grow.
 only a few plants are needed, it is easier to start them in individual pots.
For best results place two or three seeds in a Jiffy peat pellet such as the ones in
the picture. Another option is to use a peat pot
filled with moist potting soil and an inch of sterile seed starting mix on top. Once
the seedlings are well sprouted, thin to one seedling per pot. Peat pellets or
peat pots can be planted in the garden and the roots will grow right through
the pots so the young plant roots
are not damaged by transplanting out of a plastic pot.
only a few plants are needed, it is easier to start them in individual pots.
For best results place two or three seeds in a Jiffy peat pellet such as the ones in
the picture. Another option is to use a peat pot
filled with moist potting soil and an inch of sterile seed starting mix on top. Once
the seedlings are well sprouted, thin to one seedling per pot. Peat pellets or
peat pots can be planted in the garden and the roots will grow right through
the pots so the young plant roots
are not damaged by transplanting out of a plastic pot.
 will sprout best if kept at room temperature but new seedlings need
bright light and cooler temperatures to make them grow short and sturdy. If the light is too dim, they
will stretch, become spindly, and easily blow over when planted outside. Seedlings should be kept
in a sunny, but not hot, window or placed directly under the brightest fluorescent tubes.
LED Grow Lights are brighter. Even better, I have the mini-greenhouse in the picture that I have on the patio so
the light is brighter and the temperatures are cooler. There is a door that zips shut for nights near freezing.
will sprout best if kept at room temperature but new seedlings need
bright light and cooler temperatures to make them grow short and sturdy. If the light is too dim, they
will stretch, become spindly, and easily blow over when planted outside. Seedlings should be kept
in a sunny, but not hot, window or placed directly under the brightest fluorescent tubes.
LED Grow Lights are brighter. Even better, I have the mini-greenhouse in the picture that I have on the patio so
the light is brighter and the temperatures are cooler. There is a door that zips shut for nights near freezing.
 This means that plants with superior flowers, fruit or growth characteristics
can be multiplied. There are several methods so choose the easiest one that works.
This means that plants with superior flowers, fruit or growth characteristics
can be multiplied. There are several methods so choose the easiest one that works.
 are made from the current season's growth of woody plants. Many
conifers, houseplants, deciduous and broadleaf evergreen plants are started from cuttings.
Cuttings should be collected from strongly growing branches on healthy plants.
Softwood cuttings are the tips of new growth collected in late spring and
summer. Softwood cuttings usually root better but they need more care. Hardwood
cuttings are collected in the fall and winter. Yews will root better if they
are pulled off so a heel of two year old wood adheres to the base of the
cutting. Otherwise, cut the bottom off just below a leaf node. Usually, cuttings are
trimmed so they are three to six inches long.
are made from the current season's growth of woody plants. Many
conifers, houseplants, deciduous and broadleaf evergreen plants are started from cuttings.
Cuttings should be collected from strongly growing branches on healthy plants.
Softwood cuttings are the tips of new growth collected in late spring and
summer. Softwood cuttings usually root better but they need more care. Hardwood
cuttings are collected in the fall and winter. Yews will root better if they
are pulled off so a heel of two year old wood adheres to the base of the
cutting. Otherwise, cut the bottom off just below a leaf node. Usually, cuttings are
trimmed so they are three to six inches long.
 plants will not put our roots fast enough to be propagated by cuttings so they are
encouraged to put out roots while they are still attached to the mother plant.
Stooling is a method of encouraging roots to grow on woody stems so they can be
divided. Stooling is commonly used to propagate dwarf rootstocks for grafting
fruit trees.
plants will not put our roots fast enough to be propagated by cuttings so they are
encouraged to put out roots while they are still attached to the mother plant.
Stooling is a method of encouraging roots to grow on woody stems so they can be
divided. Stooling is commonly used to propagate dwarf rootstocks for grafting
fruit trees.
 will never put out new roots so they have to be grafted onto a plant
with existing roots. Also, some plants benefit from being grafted onto roots with
better genetics such as dwarfing rootstocks. Grafting is the process of cutting
a twig, called the scion, from one plant and
connecting it onto the roots or top of another plant called the rootstock. The
scion will grow into a new plant as it receives water and nourishment from the
rootstock.
will never put out new roots so they have to be grafted onto a plant
with existing roots. Also, some plants benefit from being grafted onto roots with
better genetics such as dwarfing rootstocks. Grafting is the process of cutting
a twig, called the scion, from one plant and
connecting it onto the roots or top of another plant called the rootstock. The
scion will grow into a new plant as it receives water and nourishment from the
rootstock.
 is a simpler graft which is usually used on conifers.
An oval shaped cut is made in the side of stem through the bark and slightly
into the wood. A matching cut is made in both the scion and rootstock. The cuts
are held tightly together with grafting tape or rubber strips. Once the graft
has healed, the rootstock is cut off just above the graft.
is a simpler graft which is usually used on conifers.
An oval shaped cut is made in the side of stem through the bark and slightly
into the wood. A matching cut is made in both the scion and rootstock. The cuts
are held tightly together with grafting tape or rubber strips. Once the graft
has healed, the rootstock is cut off just above the graft.
 shield is then slipped into the T under the flaps of bark until the
square top of the bud shield fits the top of the T. Then it is wrapped with
rubber strips or grafting tape so the shield is covered except for the bud. If
the piece of leaf stem drops off after a week or two, it signals that the bud
is healing properly.
shield is then slipped into the T under the flaps of bark until the
square top of the bud shield fits the top of the T. Then it is wrapped with
rubber strips or grafting tape so the shield is covered except for the bud. If
the piece of leaf stem drops off after a week or two, it signals that the bud
is healing properly.